Image Map

DIY Dry Erase Boards/ Notebooks

I love dry erase boards (like many of you, I am sure)! The kids love using them and it is such a quick way of getting a good feel for how much of my class understands my lessons.
On my second year of teaching, I got free dry erase boards from a veteran teacher and I fell in love! She told me she got them from Home Depot and they cut it for her. The edges weren't pretty and there were smudges and stains everywhere, but for a poor second year teacher like me, they were a dream come true! My students could take those everywhere and write what they were thinking and respond to my lessons. It was all fun and games except for when in the middle of a carefully crafted and planned phonics lesson , a student (let's call him Jimmy) Jimmy sneaks to the back of the room and squirts some hand sanitizer onto his board and smears it around with his bare hands. Very surprised and proud, he makes his way back to the rug and nudges the kid next him. Jimmy, with a smile from ear to ear, shows off his smudge free white board. At the end of the lesson, I routinely ask my class to erase their boards. Jimmy quickly runs to the back of the room and squirts another blob of hand sanitizer on his board. Soon enough, he had a few followers, who were happy to see their white boards smudge free. The news spread fast and soon enough the whole class had spread some hand sanitizer on their boards. As I prepared for my next lesson, I was proud to see that my students were taking steps to clean their boards and make our classroom a better place (and I didn't even have to say anything)! Needless to say, our transition into our Writing lesson took a little longer that day as students showed off their "brand new" boards to one another.
The next day, my class was extra excited for our phonics lesson. They quickly grabbed their boards, markers and erasers. I was glad to start the lesson on time and students were happy to start practicing our spelling patterns. Then suddenly, I lost the attention of all my 24 little second graders (we have all been there, when for some reason, there isn't a single student engaged in you lesson). The hand sanitizer they smeared all over their boards the day before had now dried, but the markers didn't seem to like the effects of it. As students tried to erase their boards, they were getting big black smudges that made it impossible (in their minds at least), to use the boards. I gave up on the boards for that lesson and had them do something else instead. After school, I tried to clean those white boards and they seemed to work better, but somehow during every lesson after that, there were at least 4-5 kids saying they couldn't erase their boards.
I gave up on those boards entirely and tried many DIY versions of white boards. I started my third year with laminated card stock, but they are so flexible and don't erase well either, so I decided to do something about it. I looked into buying a class set of brand new white boards, but it was way out of my budget.
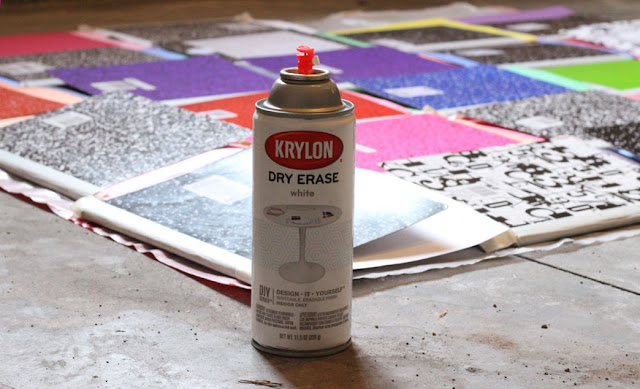
I wanted something that would look nice and would erase easily. I searched through Amazon and came across Krylon's Dry Erase White Paint. I thought about buying some wood boards and painting them, but that would be just as expensive as buying brand new white boards. So I thought that maybe I could use something I already have at school and just spray paint over it. I then came up with the idea of spray painting Composition Books and they worked! The Dry Erase Paint was just $11.99 and I made 27 Composition Dry Erase Boards.


DIY Dry Erase Boards Notebooks

I wrapped the edges of my students composition books with tape and put some construction paper inside of each so that the paint wouldn't drip inside their notebooks.


I spread them over some plastic bags I had in my garage and sprayed away!


You can still see through after the first coat.


And the second coat too. (I waited 30 minutes in between each coat)


After the third coat, some of the composition books are almost completely white.


After the fourth coat, all composition books are white. Now they just need to dry! I got too excited and used one of the boards after the first night I let them to dry. Big mistake, it did not erase well. I then waited (very impatiently) for 4 days like the manufacturer suggests and then they erased perfectly! And as a plus, they look super cute!

Assessment - I vow to not suck at it again!

Oh man, assessment! I am not going to lie, assessing my kiddos was not my strength as a first year teacher. When finishing my teacher education program, I learned many assessment tools I could use in the classroom. However, as I became a full time teacher, I learned that many of those tools are not realistic or really useful to me.

So during this summer, I vowed to not suck at assessment ever again! I haven't tried this idea, but I think it might work. Check it out:

Grade Cam

Have you heard of Grade Cam? It is an app that scans students' multiple choice assignments using your phone's or iPad's camera. It also lets you create reports and transfer them to any type of
gradebook your school might use.

Here is how I am planning on using this tool:

I will laminate one of these 5 multiple answer forms for each one of my students with their "Grade Cam IDs" already filled in for them (just to make it a little easier) and tape it to their desks. Each student will have a dry erase marker to make is possible for the forms to be reused. During my lessons, I can either have planned multiple choice questions (on a power point for example) or come up with them on the fly.

I am hoping this will eliminate all the grading I had to do and it will also make assessment fast and easy for my students. All they will need for these will be a dry erase marker and filling in the bubbles. These should take no more than 2 minutes to get done and scanning the forms is so easy that I am thinking about making it one of my classroom jobs! Once I get this tool tested, I will update this post to let you know how it works, but for now, fingers crossed!!!